Navigation

11/19/13

Facebook Headers

I've recently noticed that a lot of people use simple photos for their Facebook Headers. This is a fantastic idea... as long as the pictures fit correctly. As you may have noticed from my FB Pregnancy Announcement and Gender Reveal, my graphic design background has given me a desire to do a little more than just the simple picture for my FB headers.

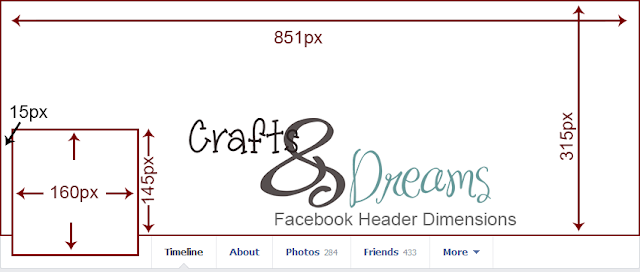
For those of you who are a little thrown by the idea of opening up any kind of editor more complicated than Paint, fear not! It is relatively painless, and I will try to explain as much of the technical details as possible. When I first started making FB headers, I relied heavily on the Timeline Dimensions page. Whoever made it is a pure genius! The only thing that bothered me when I was trying to create my own is that they don't show how many pixels are between the edge of your profile picture and the timeline photo AS WELL AS the amount of space taken up by your profile photo in total. So I figured it out myself and here is what I came up with.

For those of you who are getting a little overwhelmed... deep breath. "Px" stands for pixel, which is the dimension size that we typically use when talking about digital dimensions. Ever heard someone talk about screen resolution? Now, why are these numbers important? They are essential to figuring out how big you want your image(s).

Create Your Header

The first step is pretty simple. You have to figure out what program you want to open up and get going with. I typically use Adobe Photoshop, but that comes with a nice price tag. The free web-based alternative that I love is Pixlr.com's editor. You can pretty much do everything in Pixlr that you can in Photoshop and it's FREE!

Create a new document sized 851x315 pixels. You can think of this as your canvas. Now all you have to decide is if you want one image, multiple images, and what kind of text (if any) you want to incorporate. I recommend using the above dimension image to lay it out for yourself. The actual image is true to size, so you can even open it up in an editor and lay things over the top of it. A few examples of ones I've created are below...


Play around and have fun! It really is as simple as that. Make sure you keep in mind the space that your profile picture will cover (160x160 pixels which overlap 160x145 pixels). If you have any technical questions, please let me know. I would gladly walk you through things in a little more detail. I might actually be creating a more extensive tutorial on my Instructional Design blog, which I'll link to if I do! 

I would love to see the Facebook Headers you create. Happy Crafting!!

11/13/13

Baby Registry Checklist

I had my baby shower this past weekend and got an amazing amount of items for baby Lewis. One of the things that I am extremely impressed with, is the fact that I received 0-3 month clothes and 6 month clothes and managed to avoid the dreaded overload of "newborn" clothes. When creating my registry, I added a few onsies and sets but made sure to pick 0-3 month or 3-6 month sizes, rather than newborn. This apparently was enough of a tip off for those wanting to purchase clothes for baby Lewis!


I have several onsies in a newborn size, but have a feeling that if baby Lewis takes after my side of the family he will be straight into 0-3 months. If he happens to be a little stinker, then I know Grandma and Auntie will have no problem going shopping before we even get out of the hospital.

I already had a crib, crib mattress, and changing table thanks to yard sales. So I only had a few big items on my list. We opted for a stroller system with a jogging stroller, due to advice from my friends/family. The only other big ticket items were that I received were the baby swing, play mat, and car seat base. We also received tons of little items and goodies.

The only big items that we will have to buy are shopping cart cover, breast pump & storage bags, nursing pillow, and baby wrap. All-in-all not a bad deal! Below is the Baby Registry Checklist that I put together before creating my registry. I used TheBump's Registry 101 documents, FitPregnancy's Newborn Clothes, MommyNeurotic's Diaper Count when putting it together.


11/6/13

Changing Table Makeover


While I was originally going to simply put a changing pad on top of a dresser, I was able to get a changing table and baby bed at a yard sale for $100. The downside of the changing table was that it was pink. This called for a simple paint job. Luckily, the pink was a nice powder pink, not a bright screaming-in-your-face kind of pink. I'm not sure if you can even tell in the picture.

Honestly, I would have been changing the table color even if we were having a girl. The changing table is in the front room, since this is where we will spend the majority of our time and have the rocker. I grabbed the side table in the front room while I was at it. It was a left-over from the hubby's bachelor days and it shows.


I knew the changing table was going to be an easy fix, as it was wood. The side table on the other hand was laminate wood, and thus a complete headache. I grabbed some 1-2-3 Primer and a can of gray paint that was on sale at Walmart. I gave the side table two coats of primer and two coats of the gray paint. I gave the changing table three coats of gray paint.


I absolutely love how the changing table turned out. It's more of an antique gray-white that a harsh gray. It also happens to look fantastic with the changing pad cover that I picked up at Walmart a week before. I am starting to get excited now that I'm getting things ready!


I also really liked how the side table turned out. How could I not with how it looked before? Sadly, I have to report that even with the 2 coats of primer and 2 coats of gray paint, which I applied and let dry over an entire weekend (we're talking a minimum of 4 hours before I went for the next coat), some of the paint came off when we moved a coaster. I'm not talking about just some of the gray paint, I mean ALL the paint. Still, it works well enough to keep me happy with it until we eventually invest in new front room furniture. We are still using my old glass TV stand, which I cannot stand. Can you tell we are still renting? I can't wait until we buy a house and really start investing in some nice things. It's just not worth the headache of moving and damaging things right now. Happy Crafting!!