Navigation

10/20/13

Monkey Mobile Tutorial

We decided to go with the monkey theme, so I began looking around at different types of mobiles. I really am never thrilled with the store-bought type. They are just way too cheesy for me.

When I was trying to decide between a sock monkey and a regular monkey, I ran across this little gem from dropsofcolorshop on Etsy.

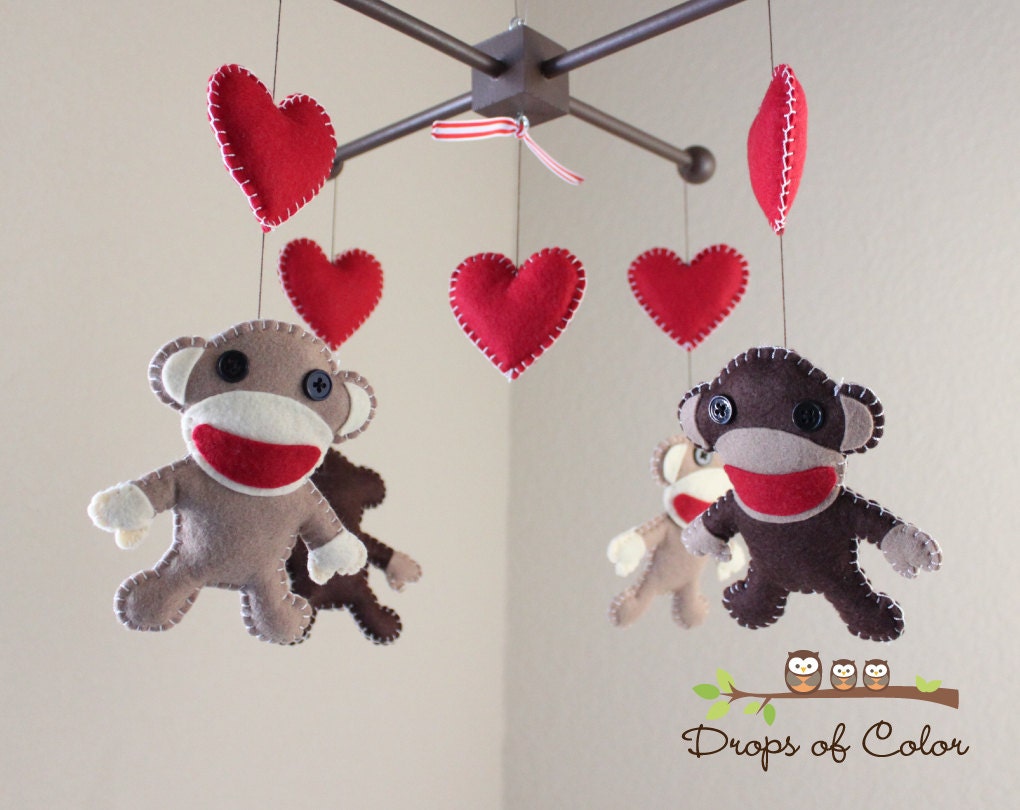
So I set to the task of figuring out how to make my own monkey mobile. Before jumping into the tutorial, I'll show you my final project.


Here is how I went about it.

What You'll Need
  • Monkey
    • Construction Paper (or heavy weight printing paper)
    • Felt (4 pieces of heavy-weight for the main body, 1-2 pieces of normal for your accent colors)
    • Thread (the kind you used to make bracelets with)
    • Normal weight thread (same or contrasting color as felt)
    • Hot Glue Gun
  • Mobile


Step 1 - Creating the Monkey

You will need to use the construction paper to create a template for you monkey. You have enough felt for 4 monkeys, keep in mind that you will need a front AND a back piece for the monkey. The template will basically need to be at largest half a sheet of paper/felt.

1. Fold the paper in half and then the top third of the paper down, this will be the portion allotted for the head of the monkey

2. Use circles to layout how you want the head, body, legs, and arms of the monkey and cut out the template.

3. Use the template to cut out 8 body pieces of the heavy felt.
4. Create a template for the face, eyes, ears, mouth, and belly.
5. Cut out the ear, face, and belly pieces in the lighter felt (you will need enough for 4 faces)

6. Cut out small eyes and the mouth in the darker felt
7. Attach the face pieces using your thread


8. Attach the face using a lighter color of thread


9. Begin hot gluing a front piece to one of the back pieces - first glue around the belly and legs, leaving the entire upper body untouched

10. Stuff the bottom of the monkey, continue gluing up the monkey and then put more stuffing in
**You can now either be done with the monkey or use the heavier thread to stitch around the outside. Below are images of both monkeys. I opted to stitch around the outside as it gives it a more polished look. I will note that this took a lot of time and I broke one of my needles, but I'm extremely happy with the final results.


I don't have any in-process images for the next few steps... I will note that I only ended up using 3 of the 4 finished monkeys.

Step 2 - Assembling the Mobile

1. Drill 6 holes in the purse handle
2. Use the hemp cord to create the dangling parts of the mobile (I used one long piece to create two strings, which allowed me to use the excess string above to create my "handle")
3. Attach buttons to the string by threading through and tying nots (make sure to use a button at the very top to keep the string from slipping through)

3. Attach the monkeys to the end of three of the strings
4. Hang and enjoy!


If you make your own monkey mobile, or if you make a different mobile based off of this tutorial, please let me know! I would love to see how yours turns out. As always, feel free to contact me/comment if you have any questions.


10/1/13

My Gender Reveal

For those of you who have seen my previous post Gender Reveal Ideas, let me just say one thing up front. No one ever mentioned that I would feel extremely fat and ugly in any picture that was taken! Also, I underestimated my husband's ability to take a picture that made me look better.

Yes, those are pretty major statements and no I will not back them up with the actual images. What I will do, is say that a few things happened that were unexpected. Hubby and I had taken the entire day off of work as planned. I was so nervous going into the ultrasound, that even I realized it was silly. The ultrasound technician (no idea if that is what they are actually called) spent about 10 minutes making checks of baby's health. She apologized at one point, saying that she knew we were anxious to find out our little baby's sex. I told her that we had waited 19 weeks, what was a few more minutes?

Once she started trying to get a clear image to determine the sex, we waited another 5-10 minutes. We have one active little baby! Legs were kicking and arms were waving. Finally the legs stopped moving and there was our little boy showing off! Then for the next 5 minutes as the technician continued to make checks of the baby, every shot had his proud little friend standing at attention. The technician, hubby, and I were dying of laughter. It was a wonderful first experience.

My appointment was scheduled at 9 AM. The ultrasound went until about 10 AM (roughly, I didn't have a watch). I then waited about half an hour for the OBGYN. Apparently there was a delivery ocurring. I asked one of the nurses how much longer she thought it would be. Finally my midwife came into the room to talk to me. She told me I could wait, but everything looked good if I wanted to see the OB at the next appointment. I hit the road and got back to the car at about 11 AM. Hubby had the GPS set for Babies"R"Us in Lexington and we were off! On the way, I called my Mom and Sister and sent text messages out to my siblings to let them know the good news. I actually made my Mom cry when I teased that we had decided to wait until the birth to tell anyone. (Oops!)

Stroller Choice

We had a blast looking at strollers and picking out the one that would work best for us. Hubby is a fairly tall guy at like 6'3, so we ended up picking out the Baby Trend Expedition ELX Travel System Stroller in Everglade.
I'm not a major fan of the color, but at least it will be neutral for whatever baby comes next and it has the adjustable handle height that my husband loved. It also has real rubber wheels and the three wheel style that I love. I realize it might be a little overboard, but I wanted something we can use anywhere. I didn't want to be one of those people who had a stroller for every type of outing. I can use this for walks, jogging, and our other adventures down the line. Plus I LOVE that it is a travel system, so the infant carrier snaps onto the stroller. After that, my Dad surprised us by heading down to spend the night and bring the infant/toddler bed and changing table we had bought at an Indiana yard sale. I'll be posting pictures and such on how I repaint the pink changing table and create a crib skirt in the future.

Facebook Reveal

Ok, enough ranting about my adventures in baby preparation and down to the stuff you are all waiting to see. What did I end up doing to announce my baby's gender to friends and family on Facebook?
This is exactly what I ended up posting that evening. A slight let-down from what I had dreamed and planned, but with everything that we did that day I was absolutely not up to having a photo shoot too. Plus EVERYONE was asking if we had found out yet. The next day was our attempt at a small photo session with my wonderfully clueless photographer husband (sarcasm intended). Bless his heart, he tried his best and there are some pretty decent pictures. However, I attempted them with an "L" initial with a blue ribbon around it (that you will see in a minute) and it was either lost in the trees or made me look five times bigger than I felt. Needless to say, I think we will attempt some pictures later on in my pregnancy, but will most likely be having my sister take them.

The picture I ended up absolutely loving is a snapshot that I quickly took inside with the "L" and the Curious George monkey that my parents had gotten us shortly after we found out we were expecting. I absolutely adore this!
I ended up using this picture to create a FB Header that announced that we were having a boy to the curious FB stalkers out there.

Below is what it looks like as a header. I might create a simple tutorial on making FB headers with correct dimensions later this afternoon. But for those who already have one announcing their pregnancy, a simple picture change and some color change will do the trick to announce the gender.