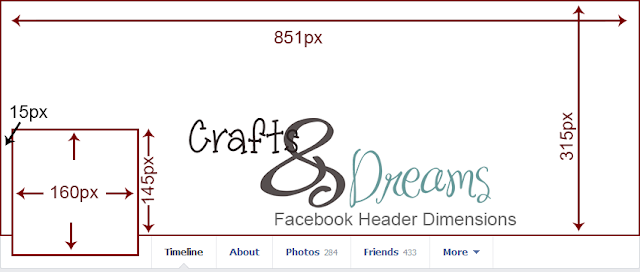
For those of you who are a little thrown by the idea of opening up any kind of editor more complicated than Paint, fear not! It is relatively painless, and I will try to explain as much of the technical details as possible. When I first started making FB headers, I relied heavily on the Timeline Dimensions page. Whoever made it is a pure genius! The only thing that bothered me when I was trying to create my own is that they don't show how many pixels are between the edge of your profile picture and the timeline photo AS WELL AS the amount of space taken up by your profile photo in total. So I figured it out myself and here is what I came up with.
For those of you who are getting a little overwhelmed... deep breath. "Px" stands for pixel, which is the dimension size that we typically use when talking about digital dimensions. Ever heard someone talk about screen resolution? Now, why are these numbers important? They are essential to figuring out how big you want your image(s).
Create Your Header
The first step is pretty simple. You have to figure out what program you want to open up and get going with. I typically use Adobe Photoshop, but that comes with a nice price tag. The free web-based alternative that I love is Pixlr.com's editor. You can pretty much do everything in Pixlr that you can in Photoshop and it's FREE!
Create a new document sized 851x315 pixels. You can think of this as your canvas. Now all you have to decide is if you want one image, multiple images, and what kind of text (if any) you want to incorporate. I recommend using the above dimension image to lay it out for yourself. The actual image is true to size, so you can even open it up in an editor and lay things over the top of it. A few examples of ones I've created are below...
Play around and have fun! It really is as simple as that. Make sure you keep in mind the space that your profile picture will cover (160x160 pixels which overlap 160x145 pixels). If you have any technical questions, please let me know. I would gladly walk you through things in a little more detail. I might actually be creating a more extensive tutorial on my Instructional Design blog, which I'll link to if I do!
I would love to see the Facebook Headers you create. Happy Crafting!!


No comments:
Post a Comment