Navigation

Showing posts with label BabyBump. Show all posts

12/10/13

Preparing for Breastfeeding

I realize it has been a while since I made my last post. I've sewed several things, so there are a couple of tutorials on the horizon. I've just been too busy sewing to sit down and write everything up and take pictures. (No, I didn't take pictures while in the process because I was too focused/lazy)... I like to think it was because I was too focused though.


One of the things that I have started looking into is getting prepared for Breastfeeding. Before, I felt like it was too far out to really get ramped up on it. But now that I am down to 10 weeks until the wee one makes his grand entrance, I think I should get ready! I am shy of my 1 year anniversary at work, so I will only be taking my vacation/sick time off. This adds up to 4 weeks of completely work-free baby time. I then plan on working virtually for roughly 2 months. I'll be making the transition back to work and pumping exclusively after that, so I need all of the preparation I can find!

Before jumping into the resources, I'd like to share that I will be able to get my Breastpump COMPLETELY FREE! No, I didn't receive one for my baby shower. I actually took the steps to contact my insurance provider. Anthem Bluecross Blueshield covers 100% the cost of lactation support and 100% lactation equipment rental/purchase. All I have to do is get the prescription from my Doctor and contact one of their approved medical equipment providers. A little more leg-work than going to Walmart or Amazon.com, but extremely worth it! There are several providers, so I actually have the choice between the Medela Swing, Medela Pump In Style, The First Years Breastflow miPump Double Pump, or Medela Advanced Personal Double Electric Breastpump. I'm leaning towards the Medela Pump In Style, but would love your feedback if you have a preference out of the ones listed!

My word of wisdom for this post - check with you insurance BEFORE buying a pump. You could get one free of charge!

Now for the links to resources for pumping exclusively...

I hope to update this post as I discover more resources, but the following are what I've collected as of today! Let me know if you find them useful OR if you have any you would like added to the list by commenting on this post.

Here are a few links to the La Leche League, which I have a feeling will be invaluable as I begin my journey. I also am currently reading "The Womanly Art of Breastfeeding" by La Leche League and love it!


Below are some of the resources that I have found on Pinterest that have been extremely helpful for me. (In no particular order...)

"Timeline of a Breastfed Baby" by the Alpha Parent


"The Coolest Things About Breastfeeding" by Cassie W on Mama Say What?


"Increasing Your Breast Milk Supply" by Erin at Simply Real Moms

11/13/13

Baby Registry Checklist

I had my baby shower this past weekend and got an amazing amount of items for baby Lewis. One of the things that I am extremely impressed with, is the fact that I received 0-3 month clothes and 6 month clothes and managed to avoid the dreaded overload of "newborn" clothes. When creating my registry, I added a few onsies and sets but made sure to pick 0-3 month or 3-6 month sizes, rather than newborn. This apparently was enough of a tip off for those wanting to purchase clothes for baby Lewis!


I have several onsies in a newborn size, but have a feeling that if baby Lewis takes after my side of the family he will be straight into 0-3 months. If he happens to be a little stinker, then I know Grandma and Auntie will have no problem going shopping before we even get out of the hospital.

I already had a crib, crib mattress, and changing table thanks to yard sales. So I only had a few big items on my list. We opted for a stroller system with a jogging stroller, due to advice from my friends/family. The only other big ticket items were that I received were the baby swing, play mat, and car seat base. We also received tons of little items and goodies.

The only big items that we will have to buy are shopping cart cover, breast pump & storage bags, nursing pillow, and baby wrap. All-in-all not a bad deal! Below is the Baby Registry Checklist that I put together before creating my registry. I used TheBump's Registry 101 documents, FitPregnancy's Newborn Clothes, MommyNeurotic's Diaper Count when putting it together.


11/6/13

Changing Table Makeover


While I was originally going to simply put a changing pad on top of a dresser, I was able to get a changing table and baby bed at a yard sale for $100. The downside of the changing table was that it was pink. This called for a simple paint job. Luckily, the pink was a nice powder pink, not a bright screaming-in-your-face kind of pink. I'm not sure if you can even tell in the picture.

Honestly, I would have been changing the table color even if we were having a girl. The changing table is in the front room, since this is where we will spend the majority of our time and have the rocker. I grabbed the side table in the front room while I was at it. It was a left-over from the hubby's bachelor days and it shows.


I knew the changing table was going to be an easy fix, as it was wood. The side table on the other hand was laminate wood, and thus a complete headache. I grabbed some 1-2-3 Primer and a can of gray paint that was on sale at Walmart. I gave the side table two coats of primer and two coats of the gray paint. I gave the changing table three coats of gray paint.


I absolutely love how the changing table turned out. It's more of an antique gray-white that a harsh gray. It also happens to look fantastic with the changing pad cover that I picked up at Walmart a week before. I am starting to get excited now that I'm getting things ready!


I also really liked how the side table turned out. How could I not with how it looked before? Sadly, I have to report that even with the 2 coats of primer and 2 coats of gray paint, which I applied and let dry over an entire weekend (we're talking a minimum of 4 hours before I went for the next coat), some of the paint came off when we moved a coaster. I'm not talking about just some of the gray paint, I mean ALL the paint. Still, it works well enough to keep me happy with it until we eventually invest in new front room furniture. We are still using my old glass TV stand, which I cannot stand. Can you tell we are still renting? I can't wait until we buy a house and really start investing in some nice things. It's just not worth the headache of moving and damaging things right now. Happy Crafting!!


10/20/13

Monkey Mobile Tutorial

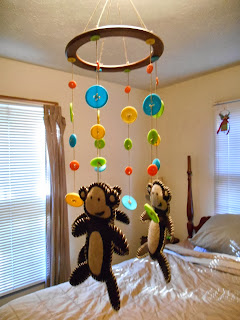
We decided to go with the monkey theme, so I began looking around at different types of mobiles. I really am never thrilled with the store-bought type. They are just way too cheesy for me.

When I was trying to decide between a sock monkey and a regular monkey, I ran across this little gem from dropsofcolorshop on Etsy.

So I set to the task of figuring out how to make my own monkey mobile. Before jumping into the tutorial, I'll show you my final project.


Here is how I went about it.

What You'll Need
  • Monkey
    • Construction Paper (or heavy weight printing paper)
    • Felt (4 pieces of heavy-weight for the main body, 1-2 pieces of normal for your accent colors)
    • Thread (the kind you used to make bracelets with)
    • Normal weight thread (same or contrasting color as felt)
    • Hot Glue Gun
  • Mobile


Step 1 - Creating the Monkey

You will need to use the construction paper to create a template for you monkey. You have enough felt for 4 monkeys, keep in mind that you will need a front AND a back piece for the monkey. The template will basically need to be at largest half a sheet of paper/felt.

1. Fold the paper in half and then the top third of the paper down, this will be the portion allotted for the head of the monkey

2. Use circles to layout how you want the head, body, legs, and arms of the monkey and cut out the template.

3. Use the template to cut out 8 body pieces of the heavy felt.
4. Create a template for the face, eyes, ears, mouth, and belly.
5. Cut out the ear, face, and belly pieces in the lighter felt (you will need enough for 4 faces)

6. Cut out small eyes and the mouth in the darker felt
7. Attach the face pieces using your thread


8. Attach the face using a lighter color of thread


9. Begin hot gluing a front piece to one of the back pieces - first glue around the belly and legs, leaving the entire upper body untouched

10. Stuff the bottom of the monkey, continue gluing up the monkey and then put more stuffing in
**You can now either be done with the monkey or use the heavier thread to stitch around the outside. Below are images of both monkeys. I opted to stitch around the outside as it gives it a more polished look. I will note that this took a lot of time and I broke one of my needles, but I'm extremely happy with the final results.


I don't have any in-process images for the next few steps... I will note that I only ended up using 3 of the 4 finished monkeys.

Step 2 - Assembling the Mobile

1. Drill 6 holes in the purse handle
2. Use the hemp cord to create the dangling parts of the mobile (I used one long piece to create two strings, which allowed me to use the excess string above to create my "handle")
3. Attach buttons to the string by threading through and tying nots (make sure to use a button at the very top to keep the string from slipping through)

3. Attach the monkeys to the end of three of the strings
4. Hang and enjoy!


If you make your own monkey mobile, or if you make a different mobile based off of this tutorial, please let me know! I would love to see how yours turns out. As always, feel free to contact me/comment if you have any questions.


10/1/13

My Gender Reveal

For those of you who have seen my previous post Gender Reveal Ideas, let me just say one thing up front. No one ever mentioned that I would feel extremely fat and ugly in any picture that was taken! Also, I underestimated my husband's ability to take a picture that made me look better.

Yes, those are pretty major statements and no I will not back them up with the actual images. What I will do, is say that a few things happened that were unexpected. Hubby and I had taken the entire day off of work as planned. I was so nervous going into the ultrasound, that even I realized it was silly. The ultrasound technician (no idea if that is what they are actually called) spent about 10 minutes making checks of baby's health. She apologized at one point, saying that she knew we were anxious to find out our little baby's sex. I told her that we had waited 19 weeks, what was a few more minutes?

Once she started trying to get a clear image to determine the sex, we waited another 5-10 minutes. We have one active little baby! Legs were kicking and arms were waving. Finally the legs stopped moving and there was our little boy showing off! Then for the next 5 minutes as the technician continued to make checks of the baby, every shot had his proud little friend standing at attention. The technician, hubby, and I were dying of laughter. It was a wonderful first experience.

My appointment was scheduled at 9 AM. The ultrasound went until about 10 AM (roughly, I didn't have a watch). I then waited about half an hour for the OBGYN. Apparently there was a delivery ocurring. I asked one of the nurses how much longer she thought it would be. Finally my midwife came into the room to talk to me. She told me I could wait, but everything looked good if I wanted to see the OB at the next appointment. I hit the road and got back to the car at about 11 AM. Hubby had the GPS set for Babies"R"Us in Lexington and we were off! On the way, I called my Mom and Sister and sent text messages out to my siblings to let them know the good news. I actually made my Mom cry when I teased that we had decided to wait until the birth to tell anyone. (Oops!)

Stroller Choice

We had a blast looking at strollers and picking out the one that would work best for us. Hubby is a fairly tall guy at like 6'3, so we ended up picking out the Baby Trend Expedition ELX Travel System Stroller in Everglade.
I'm not a major fan of the color, but at least it will be neutral for whatever baby comes next and it has the adjustable handle height that my husband loved. It also has real rubber wheels and the three wheel style that I love. I realize it might be a little overboard, but I wanted something we can use anywhere. I didn't want to be one of those people who had a stroller for every type of outing. I can use this for walks, jogging, and our other adventures down the line. Plus I LOVE that it is a travel system, so the infant carrier snaps onto the stroller. After that, my Dad surprised us by heading down to spend the night and bring the infant/toddler bed and changing table we had bought at an Indiana yard sale. I'll be posting pictures and such on how I repaint the pink changing table and create a crib skirt in the future.

Facebook Reveal

Ok, enough ranting about my adventures in baby preparation and down to the stuff you are all waiting to see. What did I end up doing to announce my baby's gender to friends and family on Facebook?
This is exactly what I ended up posting that evening. A slight let-down from what I had dreamed and planned, but with everything that we did that day I was absolutely not up to having a photo shoot too. Plus EVERYONE was asking if we had found out yet. The next day was our attempt at a small photo session with my wonderfully clueless photographer husband (sarcasm intended). Bless his heart, he tried his best and there are some pretty decent pictures. However, I attempted them with an "L" initial with a blue ribbon around it (that you will see in a minute) and it was either lost in the trees or made me look five times bigger than I felt. Needless to say, I think we will attempt some pictures later on in my pregnancy, but will most likely be having my sister take them.

The picture I ended up absolutely loving is a snapshot that I quickly took inside with the "L" and the Curious George monkey that my parents had gotten us shortly after we found out we were expecting. I absolutely adore this!
I ended up using this picture to create a FB Header that announced that we were having a boy to the curious FB stalkers out there.

Below is what it looks like as a header. I might create a simple tutorial on making FB headers with correct dimensions later this afternoon. But for those who already have one announcing their pregnancy, a simple picture change and some color change will do the trick to announce the gender.


9/5/13

Gender Reveal Ideas

I know that I promised Baby DIY in the near future, but it seems that will be put off a little longer than expected. My amazing hubby has been working up in Indiana on a roof during the weekends, so my crafting weekend times has been spent traveling with him. So while waiting for some fun tutorials and other updates, I thought I would post about my latest obsession... gender reveals!

We have decided to find out the sex of the baby. We figure it is our first baby, and we have no idea what to expect in the next few months, at least we can know one thing! Besides, it will be a surprise whether we find out in a couple of weeks or a couple of months. Plus I am still debating over a little girls name... the boys has been firmly set. I will be going to the doctor the morning of September 23rd for my first normal ultra sound. We should be able to find out the sex of the baby.

I've already decided that I'll be taking the day off, and am trying to convince hubby we should go look at Babys'R'Us for registry type stuff. I already have a registry started, but I have been trying to think of ways to get hubby more involved. I think browsing the aisles of baby wonders and picking things together will bring us closer. Considering we will BOTH be using the stuff, why should I pick out things that I want without considering hubby's preferences?

I thought we could also take some time that day to take a picture for a Gender Reveal on Facebook. Hubby doesn't have a FB so the only one who might spill the beans on there before me is my mother. To avoid any of that, I figured we would take a quick snapshot the day of and post it that evening! So some of the ideas that I've found on Pinterest that I'm a big fan of are:

Ribbon/Scarf 

I absolutely adore the idea of a picture with a ribbon/scarf representing the sex of the baby. I think this would be a fantastic new profile picture for my FB page. However, I don't think I would like it as a new cover photo.

Balloons

Balloons are incredibly popular for gender reveals. Below are a few of my favorites. The helium balloons coming out of a box and the large one with the baby's name would be fantastic for a profile pic. The floor shot with balloons surrounding the couple and the time lapse balloon release photo would be a super cute new cover photo. Odd how the majority of the balloon pics I like are girls...


Confetti


Something that would be incredibly fun for hubby and I to do is some kind of Confetti/Silly string show down. That would really require a third person to be taking the pictures though. Although we might be able to figure it out with enough effort...

Sign

An incredibly simple final idea is to simply have some type of sign stating the gender/name of the baby.


So those are the ideas I have at the moment. In a little over two weeks I'll make sure to post about what I decided to go with. On a side note, my mother is convinced that I am having a little girl. We will see soon enough!

8/16/13

Upcoming Baby DIY Projects

I have been spending way too much time on Pinterest lately. The reason for my addiction is all of the DIY things I have been finding recently! I have created a board dedicated to Baby DIY projects that I plan to make in the next few months. I will be updating these on my blog as soon as I have completed them.

6/27/13

Week 6

Today I am 6 weeks 5 days. I have my second appointment scheduled for this afternoon. I will be having my very first ultrasound! I am extremely excited. The hubby is a little hesitant. I think he is worried about getting too excited and then something happening (miscarriage) to the baby before I am 12 weeks. I completely understand his concern, but I have decided not to let my fears dampen the joy that I can have during the ride.

I have begun making a sign that I plan to present to my parents to announce the good news. I will be posting a tutorial on it in the next couple of days. Which remind me that I need to take some pictures before it is completely done!

6/19/13

Week 5

So I just found out that I might, no AM pregnant. I am still in shock, a happy doubtful shock. We have been trying for a while, and it just seems too good to be true. I have a feeling I will be one of those annoying pregnant women who rattle off statistics and obsess over any little thing. Especially given that the first thing I did was download a Pregnancy book on my Kindle... and all I've done since is read up on pregnancy, register for TheBump, and order the 40 week planner. Oh yeah... I'm going to be annoying. The plus side is that I am supposedly in week 5, so I took a picture and switched up this wedding blog to grow with my (hopefully) growing family!