When I was trying to decide between a sock monkey and a regular monkey, I ran across this little gem from dropsofcolorshop on Etsy.
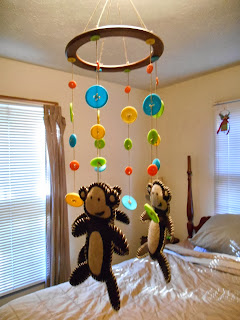
So I set to the task of figuring out how to make my own monkey mobile. Before jumping into the tutorial, I'll show you my final project.
Here is how I went about it.
What You'll Need
- Monkey
- Construction Paper (or heavy weight printing paper)
- Felt (4 pieces of heavy-weight for the main body, 1-2 pieces of normal for your accent colors)
- Thread (the kind you used to make bracelets with)
- Normal weight thread (same or contrasting color as felt)
- Hot Glue Gun
- Mobile
- Buttons (multiple colors)
- Wooden Purse Handle - I found mine on sale for $2
- Hemp cord
Step 1 - Creating the Monkey
1. Fold the paper in half and then the top third of the paper down, this will be the portion allotted for the head of the monkey
2. Use circles to layout how you want the head, body, legs, and arms of the monkey and cut out the template.
3. Use the template to cut out 8 body pieces of the heavy felt.
4. Create a template for the face, eyes, ears, mouth, and belly.
5. Cut out the ear, face, and belly pieces in the lighter felt (you will need enough for 4 faces)
6. Cut out small eyes and the mouth in the darker felt
7. Attach the face pieces using your thread
8. Attach the face using a lighter color of thread
9. Begin hot gluing a front piece to one of the back pieces - first glue around the belly and legs, leaving the entire upper body untouched
10. Stuff the bottom of the monkey, continue gluing up the monkey and then put more stuffing in
**You can now either be done with the monkey or use the heavier thread to stitch around the outside. Below are images of both monkeys. I opted to stitch around the outside as it gives it a more polished look. I will note that this took a lot of time and I broke one of my needles, but I'm extremely happy with the final results.
Step 2 - Assembling the Mobile
1. Drill 6 holes in the purse handle
2. Use the hemp cord to create the dangling parts of the mobile (I used one long piece to create two strings, which allowed me to use the excess string above to create my "handle")
3. Attach buttons to the string by threading through and tying nots (make sure to use a button at the very top to keep the string from slipping through)
3. Attach the monkeys to the end of three of the strings
4. Hang and enjoy!

If you make your own monkey mobile, or if you make a different mobile based off of this tutorial, please let me know! I would love to see how yours turns out. As always, feel free to contact me/comment if you have any questions.


No comments:
Post a Comment